Want to activate Windows 11 on your device but don’t want to pay for a product key? Well, there are multiple methods to activate Windows 11 for free. This article will guide you step by step to do it on your PC.
If you are running Windows 11 without activation, you may face certain limitations in terms of features and functionality. Activating Windows 11 is essential to get the most out of your device. It ensures that you have access to all the features and functionality that the operating system offers. How to get full access to Windows 11.
Recent Articles
1. How to activate Windows 11 for free using CMD
The steps to activate Windows 11 from Command Prompt are simple and easy to follow. In addition, this is a legal way to activate your Windows for free, since Microsoft offers KMS keys. However, follow the instructions below.
Step 1: Press the Windows key on your keyboard, type command promptand click “Run as administrator”.
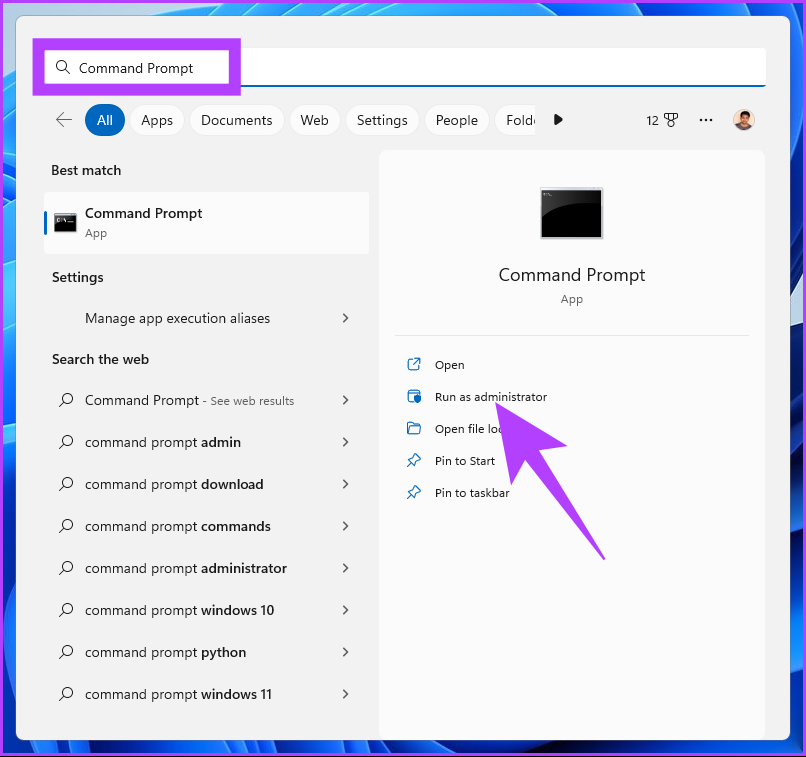
At the prompt, click Yes.
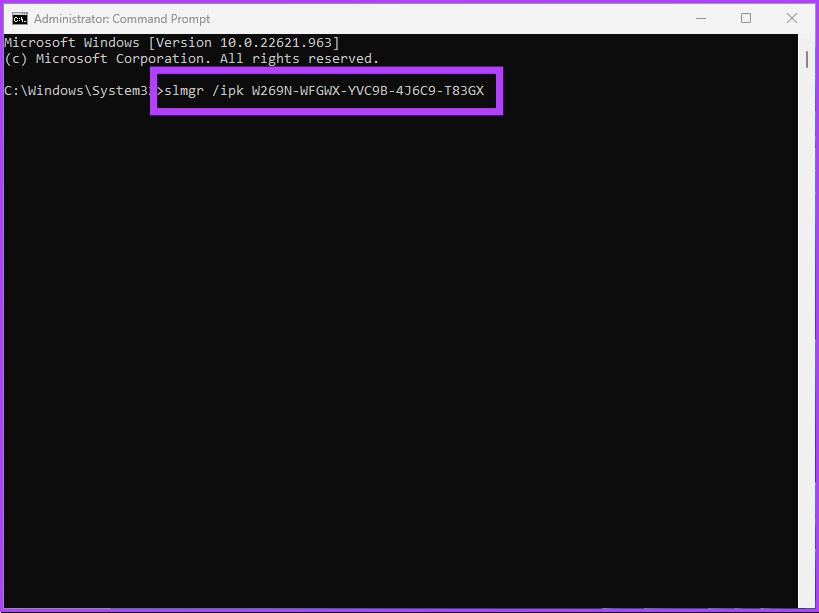
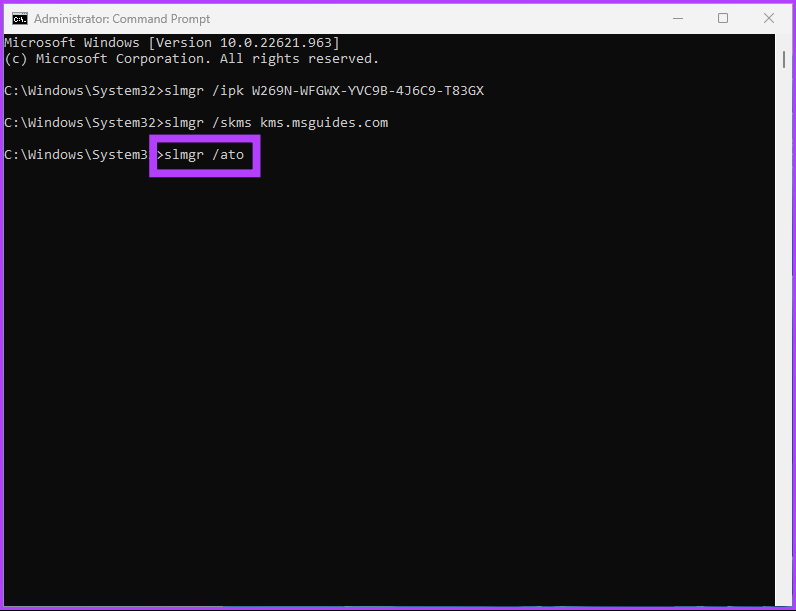
step 2: Type the following command and press Enter.
slmgr /ipk kmsclientkey
note: The KMSClientKey is the activation key that you need to enter depending on the Windows edition you choose. Find the keys below:
- Windows Home: TX9XD-98N7V-6WMQ6-BX7FG-H8Q99
- Windows Home N: 3KHY7-WNT83-DGQKR-F7HPR-844BM
- Windows Pro: W269N-WFGWX-YVC9B-4J6C9-T83GX
- Windows Pro N: MH37W-N47XK-V7XM9-C7227-GCQG9
- Windows Education: NW6C2-QMPVW-D7KKK-3GKT6-VCFB2
- Windows Education N: 2WH4N-8QGBV-H22JP-CT43Q-MDWWJ
For example, if you want to activate Windows 11 Pro, use the command slmgr /ipk W269N-WFGWX-YVC9B-4J6C9-T83GX.
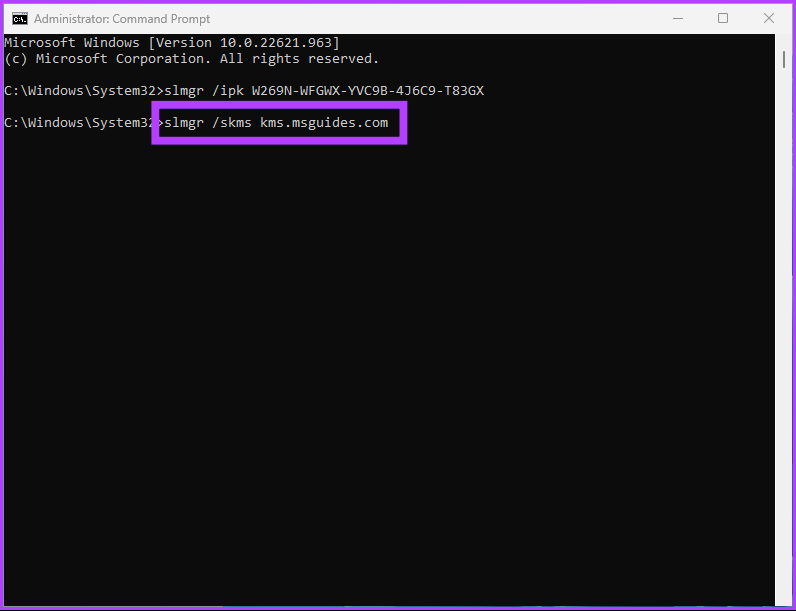
step 3: You need to set up a KMS server with the following command.
slmgr /skms yourserver
note: Enter instead of yourserver kms.msguides.com or kms8.msguides.com.
step 4: Finally, type the following command and press Enter.
slmgr /ato
This command will activate your Windows for free. If this method is too complicated or too long, check out the next method.
2. How to activate Windows 11 for free using batch file
DisclaimerNote: Although we have reviewed the batch script, Microsoft does not recommend using batch scripts to activate Windows 11. So, do this method at your own discretion.
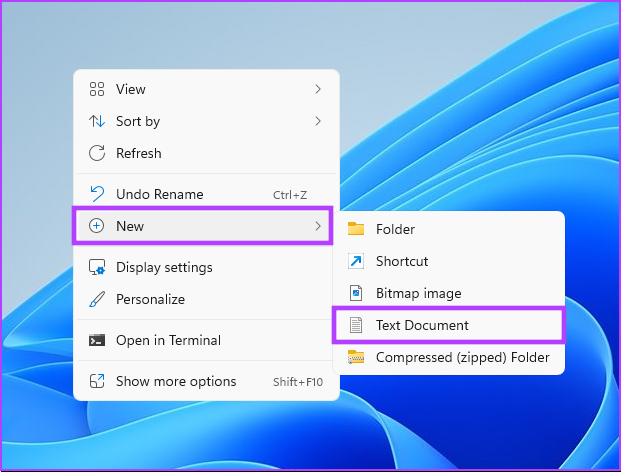
Step 1: Right-click on the desktop, select “New” and then “Text Document”.
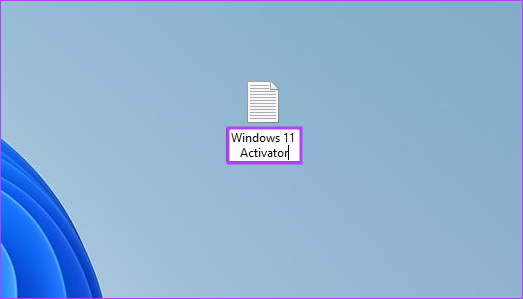
step 2: Name the file and press Enter.
example: Name the file “Windows 11 Activator”.
step 3: Copy and paste the following script into the text document. Or you can download the text document from the link below and go to step 5.
@echo off

title Activate Windows 7 / 8 / 8.1 / 10 for FREE!&cls&echo =====================================&echo #Copyright: MSGuides.com&echo =====================================&echo.&echo #Supported products:&echo - Windows 7 Professional&echo - Windows 7 Professional N&echo - Windows 7 Professional E&echo - Windows 7 Enterprise&echo - Windows 7 Enterprise N&echo - Windows 7 Enterprise E&echo - Windows 8 Core&echo - Windows 8 Core Single Language&echo - Windows 8 Professional&echo - Windows 8 Professional N&echo - Windows 8 Professional WMC&echo - Windows 8 Enterprise&echo - Windows 8 Enterprise N&echo - Windows 8.1 Core&echo - Windows 8.1 Core N&echo - Windows 8.1 Core Single Language&echo - Windows 8.1 Professional&echo - Windows 8.1 Professional N&echo - Windows 8.1 Professional WMC&echo - Windows 8.1 Enterprise&echo - Windows 8.1 Enterprise N&echo - Windows 10 Home&echo - Windows 10 Home N&echo - Windows 10 Home Single Language&echo - Windows 10 Home Country Specific&echo - Windows 10 Professional&echo - Windows 10 Professional N&echo - Windows 10 Education N&echo - Windows 10 Education N&echo - Windows 10 Enterprise&echo - Windows 10 Enterprise N&echo - Windows 10 Enterprise LTSB&echo - Windows 10 Enterprise LTSB N&echo.&echo.&echo ====================================&echo Activating your Windows... & cscript //nologo c:\windows\system32\slmgr.vbs /ipk FJ82H-XT6CR-J8D7P-XQJJ2-GPDD4 >nul&cscript //nologo c:\windows\system32\slmgr.vbs /ipk MRPKT-YTG23-K7D7T-X2JMM-QY7MG >nul&cscript //nologo c:\windows\system32\slmgr.vbs /ipk W82YF-2Q76Y-63HXB-FGJG9-GF7QX >nul&cscript //nologo c:\windows\system32\slmgr.vbs /ipk 33PXH-7Y6KF-2VJC9-XBBR8-HVTHH >nul&cscript //nologo c:\windows\system32\slmgr.vbs /ipk YDRBP-3D83W-TY26F-D46B2-XCKRJ >nul&cscript //nologo c:\windows\system32\slmgr.vbs /ipk C29WB-22CC8-VJ326-GHFJW-H9DH4 >nul&cscript //nologo c:\windows\system32\slmgr.vbs /ipk BN3D2-R7TKB-3YPBD-8DRP2-27GG4 >nul&cscript //nologo c:\windows\system32\slmgr.vbs /ipk 2WN2H-YGCQR-KFX6K-CD6TF-84YXQ >nul&cscript //nologo c:\windows\system32\slmgr.vbs /ipk NG4HW-VH26C-733KW-K6F98-J8CK4 >nul&cscript //nologo c:\windows\system32\slmgr.vbs /ipk XCVCF-2NXM9-723PB-MHCB7-2RYQQ >nul&cscript //nologo c:\windows\system32\slmgr.vbs /ipk GNBB8-YVD74-QJHX6-27H4K-8QHDG >nul&cscript //nologo c:\windows\system32\slmgr.vbs /ipk 32JNW-9KQ84-P47T8-D8GGY-CWCK7 >nul&cscript //nologo c:\windows\system32\slmgr.vbs /ipk JMNMF-RHW7P-DMY6X-RF3DR-X2BQT >nul&cscript //nologo c:\windows\system32\slmgr.vbs /ipk M9Q9P-WNJJT-6PXPY-DWX8H-6XWKK >nul&cscript //nologo c:\windows\system32\slmgr.vbs /ipk 7B9N3-D94CG-YTVHR-QBPX3-RJP64 >nul&cscript //nologo c:\windows\system32\slmgr.vbs /ipk BB6NG-PQ82V-VRDPW-8XVD2-V8P66 >nul&cscript //nologo c:\windows\system32\slmgr.vbs /ipk GCRJD-8NW9H-F2CDX-CCM8D-9D6T9 >nul&cscript //nologo c:\windows\system32\slmgr.vbs /ipk HMCNV-VVBFX-7HMBH-CTY9B-B4FXY >nul&cscript //nologo c:\windows\system32\slmgr.vbs /ipk 789NJ-TQK6T-6XTH8-J39CJ-J8D3P >nul&cscript //nologo c:\windows\system32\slmgr.vbs /ipk TX9XD-98N7V-6WMQ6-BX7FG-H8Q99 >nul&cscript //nologo c:\windows\system32\slmgr.vbs /ipk 3KHY7-WNT83-DGQKR-F7HPR-844BM >nul&cscript //nologo c:\windows\system32\slmgr.vbs /ipk 7HNRX-D7KGG-3K4RQ-4WPJ4-YTDFH >nul&cscript //nologo c:\windows\system32\slmgr.vbs /ipk PVMJN-6DFY6-9CCP6-7BKTT-D3WVR >nul&cscript //nologo c:\windows\system32\slmgr.vbs /ipk W269N-WFGWX-YVC9B-4J6C9-T83GX >nul&cscript //nologo c:\windows\system32\slmgr.vbs /ipk MH37W-N47XK-V7XM9-C7227-GCQG9 >nul

echo ------------------------------------&echo.&echo.&set i=1

:server

if %i%==1 set KMS_Sev=kms7.MSGuides.com

if %i%==2 set KMS_Sev=kms8.MSGuides.com

if %i%==3 set KMS_Sev=kms9.MSGuides.com

if %i%==4 goto notsupported

cscript //nologo c:\windows\system32\slmgr.vbs /skms %KMS_Sev% >nul

cscript //nologo c:\windows\system32\slmgr.vbs /ato | find /i "successfully" && (echo.& echo ====================================== & echo. & choice /n /c YN /m "Would you like to visit my blog [Y,N]?" & if errorlevel 2 exit) || (echo The connection to the server failed! Trying to connect to another one... & echo Please wait... & echo. & echo. & set /a i+=1 & goto server)

explorer "http://MSGuides.com"&goto halt

:notsupported

echo ======================================&echo.&echo Sorry! Your version is not supported.

:halt

pause >nul
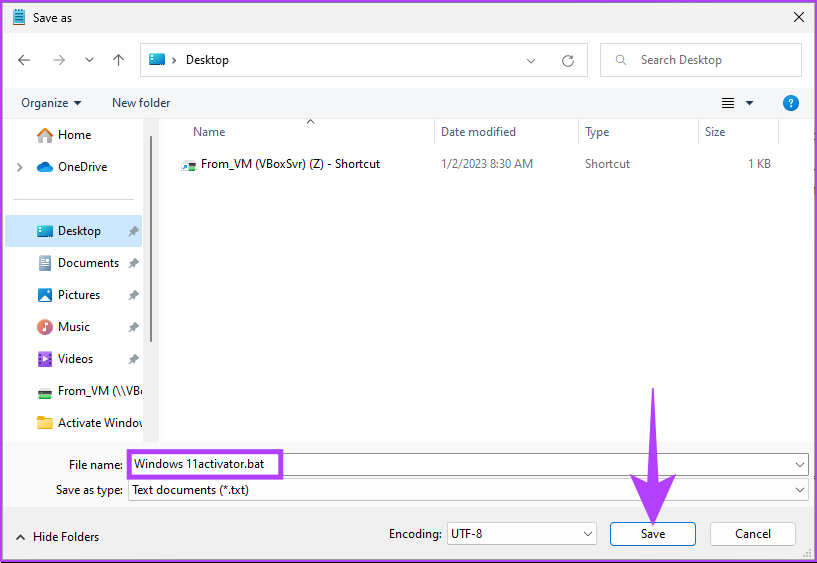
step 3: Go to File and select Save As from the drop-down menu.

step 4: Name the file as “Windows11activator.bat” and save it as a .bat file.
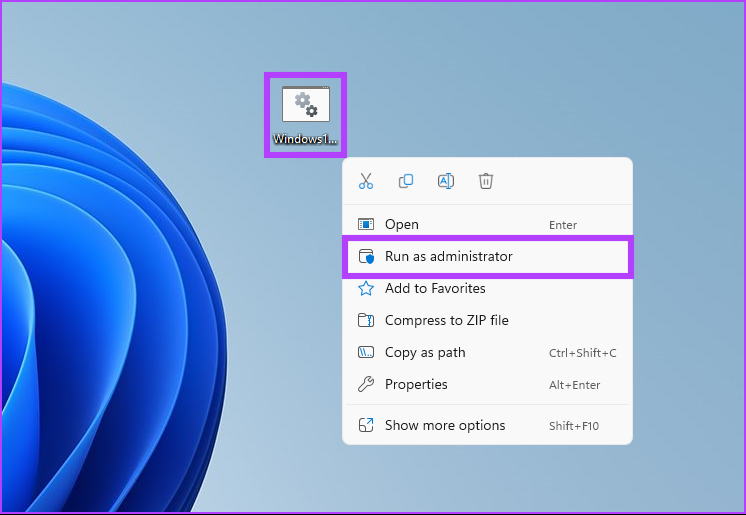
step 5: Right-click the file and select “Run as administrator”.
step 6: You will receive a message that Windows has detected a threat. click it
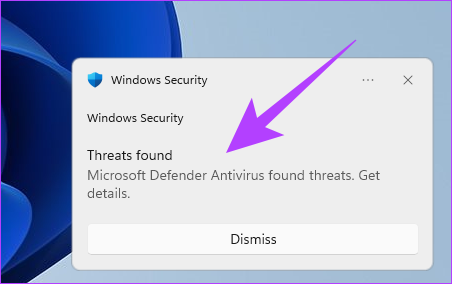
You will be redirected to Windows Defender settings.
step 7: Under Virus & Threat Protection, under Current Threats, select Allow on Device and click Start Actions.
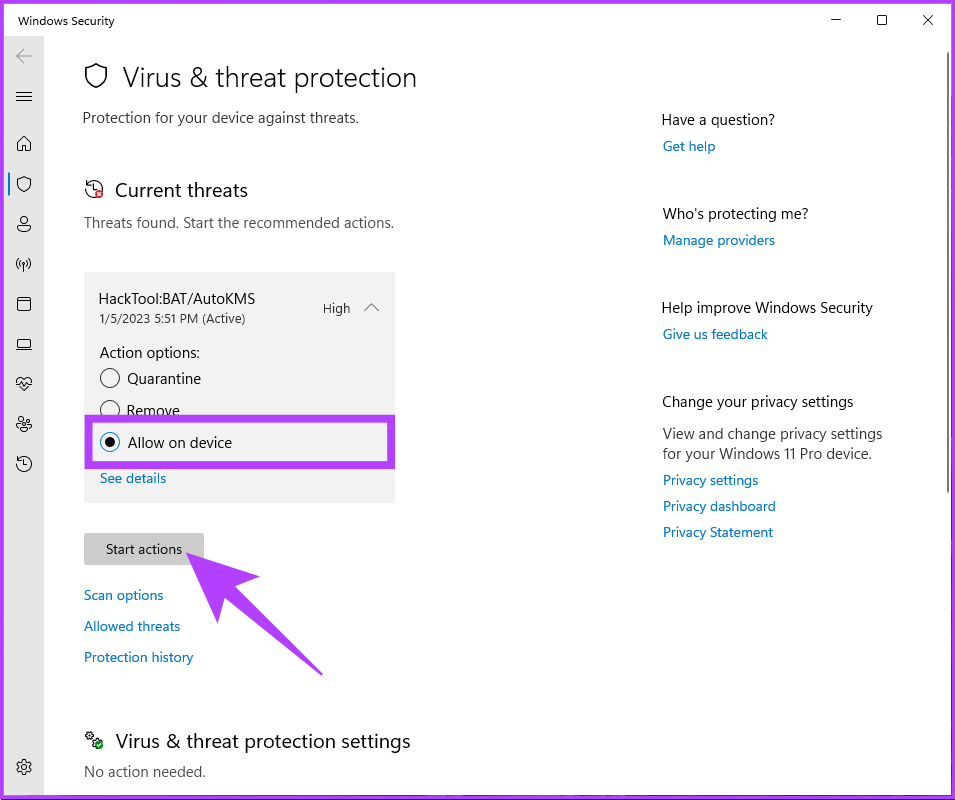
When you’re done, close the window.
step 8: Return to the file, right click on it and select “Run as administrator”.
A command prompt will open and the activation process will begin. You will receive the message “Product activated successfully”. After that, close the window. You can verify that activation was successful by following the steps in the next section.
How to check if Windows 11 is activated
Before activating your Windows 11 PC for free, it is important to check if it is already activated. You don’t always have to enter the product key, most of the time Windows will automatically retrieve it from the registry or physical media (in some cases) to verify that it’s properly licensed.
There are several ways to check your PC’s activation status. Continue reading.
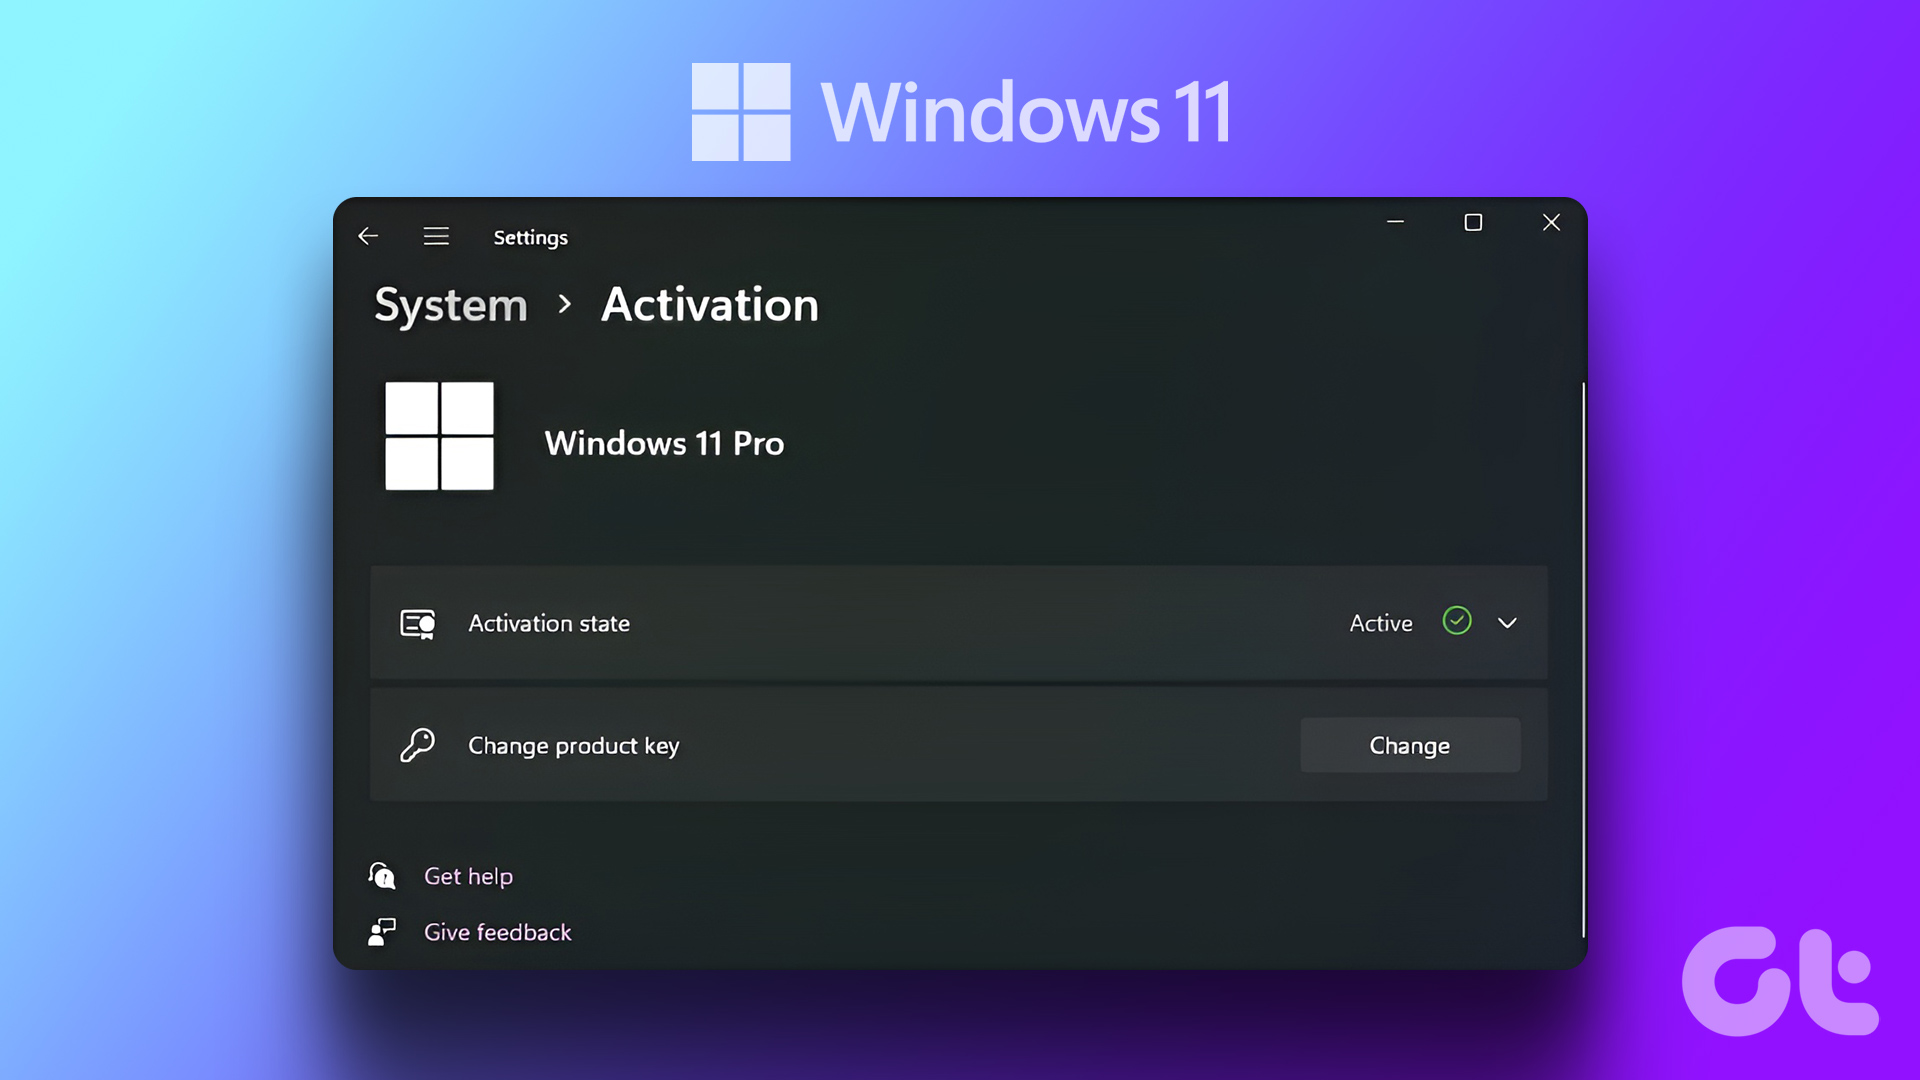
Method 1: Check with Windows Settings app
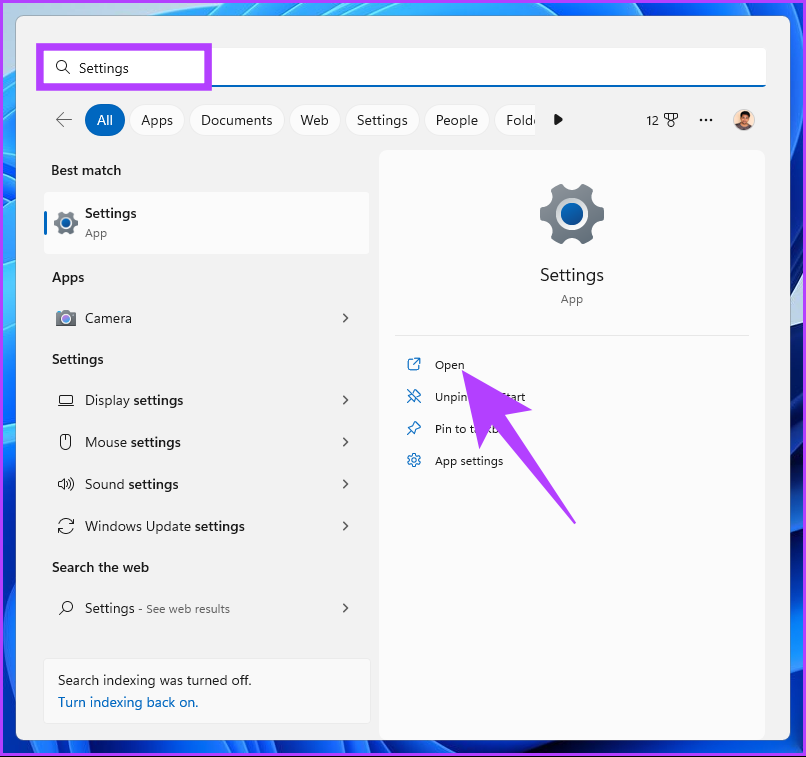
Step 1: Press the Windows key on your keyboard, type settingsand click Open.
step 2: Under System, scroll down and click on the Activation option.
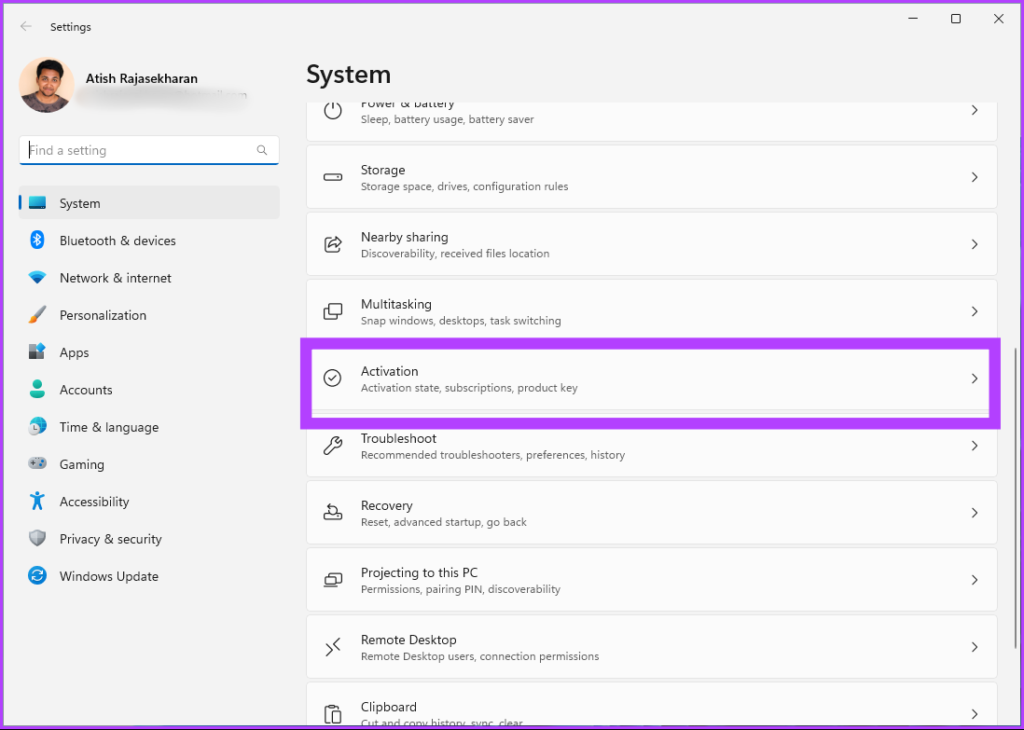
step 3: If your PC is not activated, the activation status is displayed as Not active.

Method 2: Check with Command Prompt
Step 1: Press the Windows key on your keyboard, type command prompt and click “Run as administrator”.
At the prompt, click Yes.
step 2: Type the following command and press Enter.
slmgr /dli
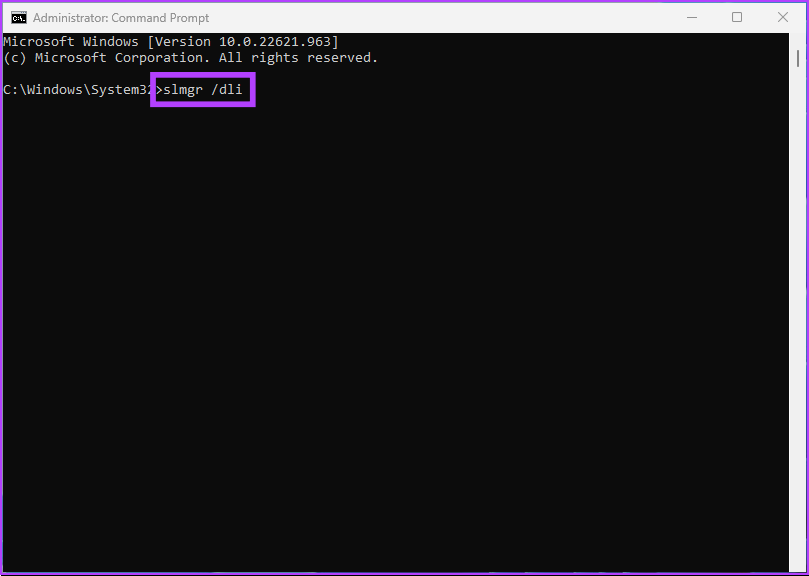
If the Windows Script Host prompt shows “Error: Product key not found”, it means that there is no product key associated with the Windows 11 PC.
If you want to avoid going through all these steps and want to activate your Windows 11 PC quickly, buying a license is better than workarounds. But first, you need to uninstall the installed Windows 11 license by following the methods mentioned above.
How to disable Windows or uninstall a product key
Before purchasing a digital license, it is ideal to uninstall the Windows 11 license installed using the above methods. That’s how it’s done.
Step 1: Press the Windows key on your keyboard, type command promptand click Run as administrator.
step 2: Type the following command and press Enter.
slmgr /upk
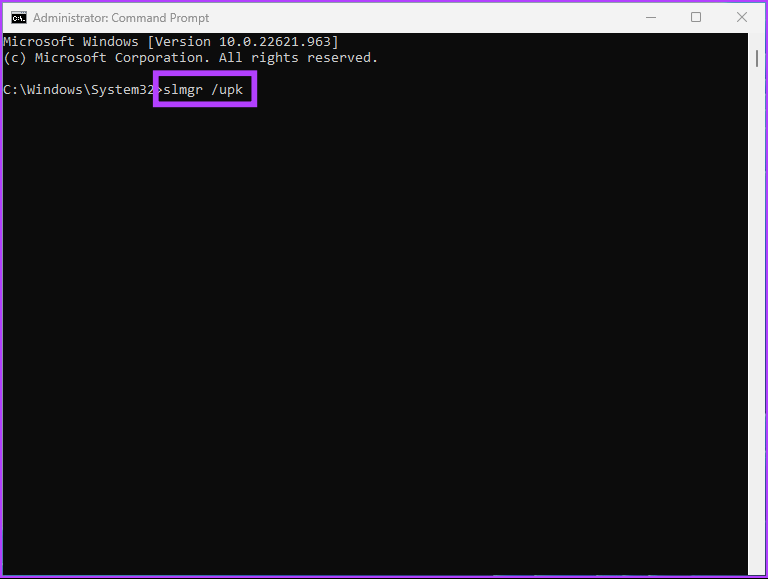
You will get a “Windows Script Host” prompt with the message “Product key uninstalled successfully”.
That’s it. After uninstalling the Windows product key, proceed to the next method to purchase a digital license.
How to purchase a digital license and activate Windows
Step 1: Press the Windows key on your keyboard, type settingsand click Open.
step 2: Under System, scroll down and click on the Activation option.
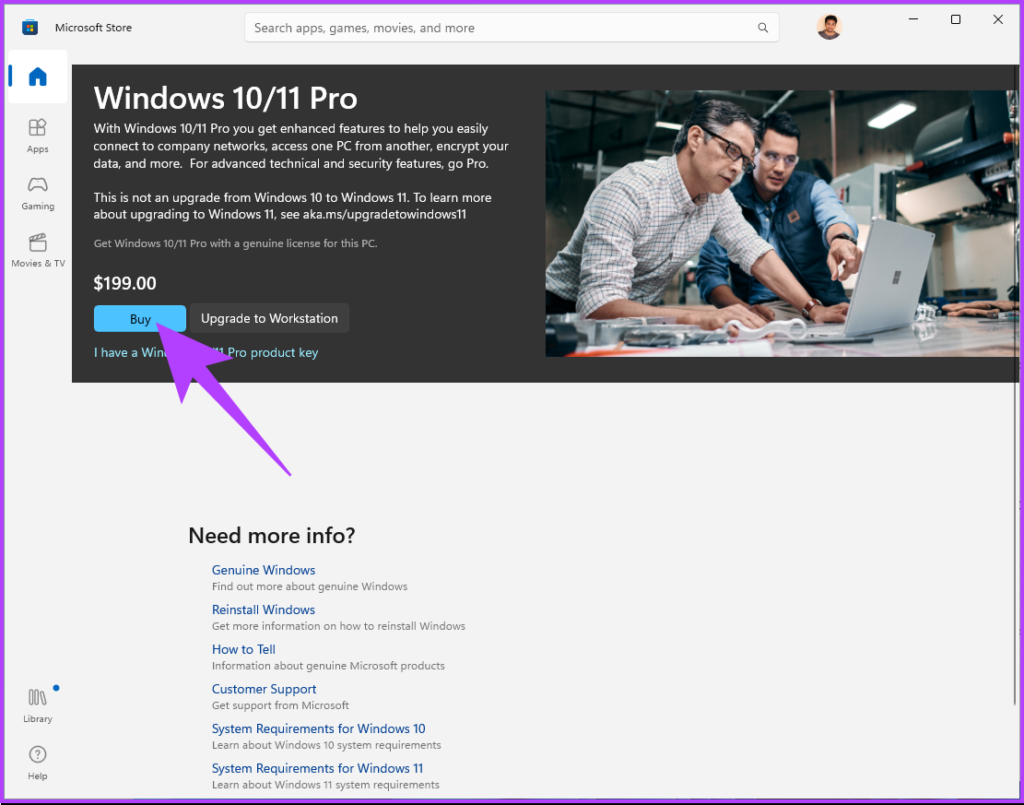
step 3: Next to Get a new license in the Microsoft Store app, click Open Store.
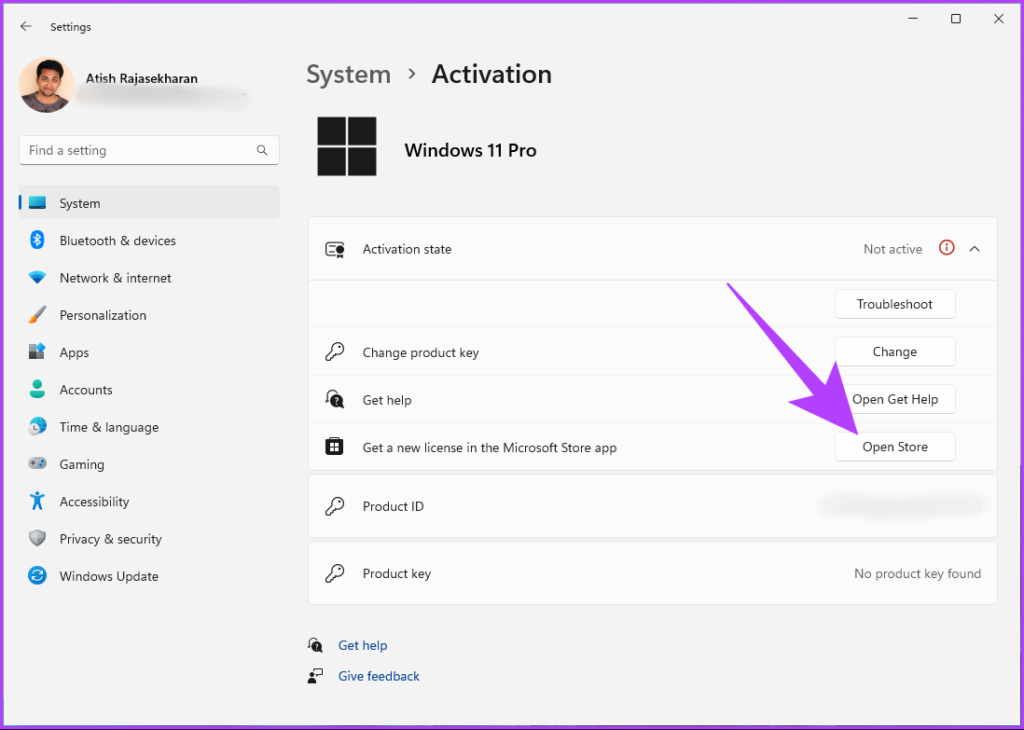
step 4: Click the Buy button and follow the purchase instructions.
note: Make sure you have signed in to the Microsoft Store with your Microsoft account.
Here we go. Your Windows 11 digital license will be activated once you have completed and paid for the prompts. You can check the status by going to Activation Status in Windows Settings.
Frequently asked questions about Windows 11 free activation
Yes, you can activate Windows 11 later if this is not possible during the initial installation process. Windows usually grants you a grace period for a limited time, usually 30 days. During this time, you can use most features and functionality of the operating system, although some features may be limited or unavailable.
It is not illegal to use unactivated Windows. However, they will have fewer features and functions. For example, you can’t do personalization, use security features, get automatic updates, or use remote desktop.
Activating Windows does not delete any files or data from your device. The activation process verifies that you are using a legitimate and properly licensed copy of the operating system. It unlocks all the features and functions of Windows.
Use Windows fully
As you can see, activating Windows 11 for free is easy. By following the steps outlined in this article, you can successfully activate Windows 11 on your PC and enjoy all its features and functions without any limitations. Now that you know how to activate Windows 11 for free, you might also want to know the top 4 ways to add or remove optional features on Windows 11.

